(EN) SKYPE EMPRESARIAL UV - Configure Audio
Set options for audio devices in Skype for Business
Let's learn how to set up and use a headset, the built-in microphone and speakers on the computer or another device for Skype for Business audio. To enjoy the best audio quality during a call or a Skype for Business meeting, we will use an audio device optimized for Skype for Business. To test the quality of the audio, we will follow the steps in the section Test audio quality.
To use Skype for Business's audio features, our equipment must have a working speaker and microphone. If there is no integrated microphone, we will have to connect an external microphone or headphones to our equipment.
Note: If we use Skype for Business with Windows 8.1, we must make sure to update our device drivers to the latest version.
Configure our device
Note: To ensure that you can choose your favorite audio device every time Skype for Business starts, it is important to follow all the steps in this section.
- In the main Skype for Business window, click on the arrow next to the Options button
 and select Tools> Audio device configuration.
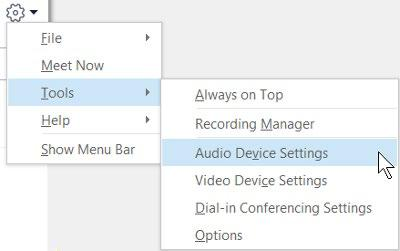
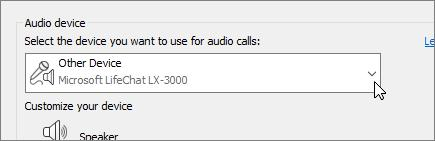
- In Audio Device, we will select the device that we want to use.
- We will click on the green arrow next to the speaker to hear a sample tone and drag the slider to where we want to adjust the volume.
- To test the microphone volume, we will talk for a few seconds. The volume is adequate if the progression bar is located in the middle of the test area. We will drag the slider next to the microphone to adjust the microphone volume.
- We will click on the green arrow next to the bell to hear a call reception sample ringer and drag the slider to adjust the ringer volume.
- We will click on Check call quality and follow the instructions to record a short message and play it. We will adjust the audio as necessary.
- If we have more than one audio device, we can choose to sound both when we receive a call. In Secondary Ringer, we also select Sound, and then select an additional device.
We can also select Reactivate when the phone rings and the speakers will automatically be reactivated when we receive a call from Skype for Business.
- We will select Allow stereo audio playback when available to ensure we enjoy the best audio quality during a meeting.
- At the end, we will click on OK.
SUGGESTION
Tip: We can select different devices for the microphone and speakers in each section. However, to avoid echoes, it is better to use the same device for both. If we need to use independent devices, we will lower the volume of the speakers to reduce possible echoes.
Do not we see our audio device?
If we do not see the device in the list, we must make sure that it is
connected directly to the computer. Then, we will follow the instructions of the device to install it.
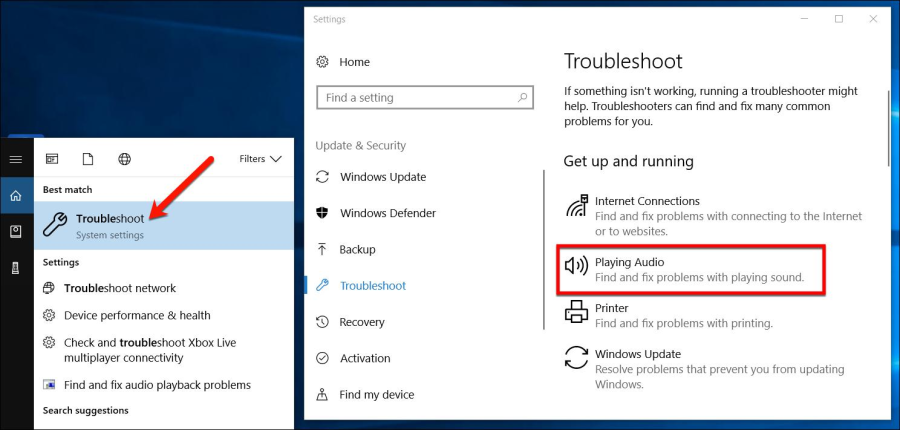
If we need help to solve the audio or sound problems, we will try the audio problem solver, since audio problems can often be corrected automatically. To run the problem solver, we will click on the Start button, and we will write Solve problems and we will click on Solve problems in the list. We will click on Audio playback> Run the problem solver.
Test audio quality
Before starting a Skype for Business call or meeting, we must make sure that our audio device sounds the way it should.
On the lower left side of the main window of Skype for Business, we will click on Select the main device.
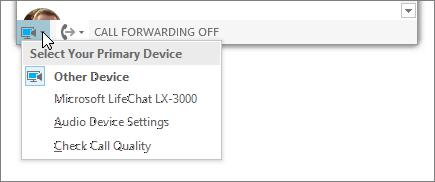
- We will click on Check call quality and follow the instructions to record a short message and play it.
- If we are not satisfied with the audio quality, we will click in Audio device settings to adjust the microphone and speakers, or to select another device.
Mute the microphone
To mute the microphone during a meeting, we will click on the
Silence button. We will click again on the same button to reactivate the microphone.

| Rev: | 2019 / 03 |
| Lang. | |
| +Info | |
| Form.: | |
|
- (EN) SKYPE EMPRESARIAL UV - Installation and configuration
- (EN) SKYPE EMPRESARIAL UV - Configure Audio
- (EN) SKYPE EMPRESARIAL UV - Configure Video
- (EN) SKYPE EMPRESARIAL UV - Add a contact
- (EN) SKYPE EMPRESARIAL UV - Make and receive calls
- (EN) SKYPE EMPRESARIAL UV - Make and receive video calls
- (EN) SKYPE EMPRESARIAL UV - Chat
- (EN) SKYPE EMPRESARIAL UV - Instant messages
- (EN) SKYPE EMPRESARIAL UV - Share screen
- (EN) SKYPE EMPRESARIAL UV - Share and schedule
- (EN) SKYPE EMPRESARIAL UV - Record and play
- (EN) SKYPE EMPRESARIAL UV - Record Manager
SERVEI D'INFORMÀTICA - UNIVERSITAT DE VALÈNCIA